Latest Movie :
Recent Movies
Hiển thị các bài đăng có nhãn maybelline. Hiển thị tất cả bài đăng

Ultrathin Gold Nail Ornaments


Hello guys. I'm back with a nail look I enjoyed. This is the first time I'm trying out this type of nail decorations. If you're wondering how come my nails are so short, the reason is, well, my nails got so damaged that I had to take a break and just use treatments and wait until they get back to normal. But thing are getting better already.

Products used:
Red nail polish: Maybelline, mini colorama (old), no. 150
Gold glitter top coat: smart girls get more, no. 117
Top coat: Essence, studio nails, better than gel nails, top sealer - a great product for sealing in nail art.
Nail decorations: BornPretty, 30Pcs/set Ultrathin, Diamond Crown Cross Design Charming 3D Nail Art Decoration, no.16683 (pattern no.32)
Link for this product: CLICK HERE

This is the first time I'm trying out this type of nail decorations. They're very thin, and they're easily bendable, but they're firm enough and will not snap or break while bending. This is how I use this product: first I would bend the nail decorations to fit my nail shape (I do this before I've put any nail polish on). Then I apply two coats of nail polish, and I use tweezers to place the decoration onto my nail while the nail polish is still wet. After this I use a tool (or a toothpick) to push the decoration into place, making sure that no ends are sticking out. When the bottom polish is dry, I apply a top coat to seal everything into place. That's how I do it, maybe someone has a different method. This turned out to be very good and the decorations stayed in position for 4 days until I removed them. But it's important not to have any parts sticking out, so make sure you apply them correctly. The first time I tried them it didn't all go smoothly (photos below), but I soon got the hang of things and I figured out how this works. All in all, the decorations are fun, it's easy to learn how to use them, and I think they look really good on nails, they really stand out. ;)
This photo below with green nail polish shows the first time I tried these nail decorations, and it didn't turn out so well. I put too much nail polish of a bad texture, and then I pressed the decorations too hard, and then I absolutely ruined it with top coat. But now I know better. It can't all go perfect the first time, right? ;)
The green polish used here is Catrice's 'Run Forrest Run', I also used some old Maybelline and Essence glitter top coats. In this photo below you can see how the nail decorations arrived (also, notice how damaged my nails got from all the nail polish and not taking care of them *sadface*):
I really like how the red look turned out. These decorations look really good against a dark background and red shades, but they also go really well with nude or baby pink polishes. All in all, a fun product that I've enjoyed trying out. 
Thanks for stopping by, don't forget to follow me on all my social media ;)

Love, J.


***BornPretty has sent me these nail art decorations for reviewing purposes. All opinions stated are my own.

Nail Fail: The Ugly Edition


Hey everyone! The title says it all, this post is featuring the less flattering nail looks. Some of these are here because the execution of a good idea went wrong, some are here because the idea was wrong to begin with. And some are here because the photos didn't turn out well. Anyways, here is the Nail Fail post.

The problem with the look above was the ring finger. In order to dry the nail polish faster on the other fingers, I applied some oil. Somehow the oil got onto the ring finger, and the nail pearls would not stick to the nail polish. They just slid off. So this look was ruined (but it was ugly anyways). The pink nail polish is from an old essence collection, the white pearls are Catrice LE, the pink pearls are essence. The white and black glitter is by Maybelline (Colorama, Polka Dots, no.197). On the pointer I'm wearing glitter from Catrice (old collection, no.40, I'm Dynamite), and on the pinky I used the Maybelline topper and a glitter nail polish by Smart Girls (LE, no.116). Turns out, I'm not a big fan of the smart girls glitter, it's difficult to pack on a lot. Or maybe I'm just over glitter. All in all, I do not like this look - it just looks wrong.
So here I'm wearing a shade by Catrice, Caught On The Red Carpet. It's a great shade, one of my absolute all-time favorites. I wanted to top it off with one of my favorite top coats from essence's Metal Glam limited edition. Here are the results:
What happened was, the nail polish with the gold flakes ruined the base, it pulled it off, and that's why you can see the uneven red coat underneath. All in all, it would be good in my opinion for essence to put this gold flakes top coat in the standard range. You just have to be careful and always apply a transparent top coat first, so the gold flakes do not ruin the base color. I love how this polish looks and I've worn it a lot. You probably remember this polish, it was in high demand when this trend edition was out:
Here is one gold and bronze look:
I didn't like this gold look because I felt like my nails looked like duck feet (if that makes sense). I applied the nail polish wider towards the tip of the nail, that's why it looks weird. This polish is by Catrice, no.910, Oh My Goldness, and here I am wearing 3 (or maybe even 4) coats. So, not a fun polish, and it doesn't look very good layered over other polishes. Also, the pictures kinda suck.
This last look had two huge flaws. The first problem was that the photos came out really weird, my skin looks blue, it's really creepy (the one featured above is one of the better pictures LMAO). The other problem was that this nail polish was too liquid and it spilled towards my cuticles. When this happens, it's impossible to clean it, and it looks really bad (looks messy). I'm wearing a nail water decal from KKCenterHK (CLICK HERE), which I love, but unfortunately, the nail sticker does not have the white parts between the petals. So, it was barely visible over the red background. That's why it really only looks good over white nail polish.

So that's the Nail Fail post. Do you enjoy seeing these fail posts? Let me know in the comments, and thanks for stopping by. Don't forget to follow me. 

Love, J.

Ombre Nail Look: White To Purple


Hey guys! Well, we all saw this coming: one more Ombre nail look from me. Does it seem like I'm always wearing Ombre nails? But can you blame me? My hands look so fun (or crazy? I'm gonna go with fun). What I'm loving about this look is the super shiny top coat that tied it all together.


Products used (from thumb until pinky):
Base coat: essence, Studio nails, XXL nail thickener: This base peels off in chunks if you wear it alone. I do not think it does much for my nails. I got it during the last sale, so it should no longer be available.
essence, nail art, Stampy polish, 001 white: This polish is great for stamping, but not great when worn alone. It cracks easily and is very streaky, and the texture is like rubber.
Maybelline, mini colorama, 26 candy bar: This is an old polish, but it's better than I remember (I'm trying to use up some of my older polishes). Surprisingly, it gives even coverage. I love this shade of bubblegum pink.
Catrice, 030 Meet Me At Coral Island: An old polish with even coverage. This shade is closer to orange than to coral.
essence, colour&go, old pink polish: I loved this old line better than the new one. And now the new one will be on sale (all the polishes are leaving), and the new polishes are coming out. I love essence polishes, there are great ones in their collection. This one has the best texture and covers in one coat.
Catrice, 120 Plum Play With Me: Another oldie, I'm wearing two coats. Gives even coverage, but it's too dark, the purple color gets lost and all you see is black.
essence, Studio nails, better than gel nails, top sealer: Loving this top coat! Top coats are very important when you're wearing Ombre nails - they tie everything together. This one dries insanely fast and it's so shiny.

Olival, Olovka za njegu noktiju i zanoktica: Ova olovka mi je OK, ali nisam pretjerano oduševljena. Privremeno mi nokti izgledaju bolje, ali ne primjećujem neko značajno poboljšanje stanja mojih noktiju. Jedna zamjerka: jako se sporo upija. I ima snažan miris po eteričnim uljima (nije za svakog).
So I wore yet another Ombre nail look. What do you think? To me, these look fabulous! I'm so wearing Ombre tomorrow as well! What do you think of this color combo? 

Thanks for stopping by, don't forget to follow me on Facebook or Twitter or Instagram (links are on the right).

Love to all, J.

3 Nail Looks That Prove I Can't Paint

Hey beauties! So, some time ago I got these nail art brushes to review, and as I was doing that, a painful notion came back to me: I can't paint to save my life. How sad is that? :( I mean, I guess my expectations were too high, I was expecting some nice looks, but instead I got this average mush - and it's all my fault. Nevertheless, in this post you may find three nail looks that should have looked at least 3 times better. But, I suck, so...

The first look I did was a skyline look. I used:
Deborah Milano, Pret A Porter, no.29, Blue Paradise
essence, nail art, stampy polish, 001 white (sponged on)
black acrylic paint
essence, better than gel nails, top coat
To apply the acrylic paint on to my nails I used this product from KKCenterHk:
N.Nail 15 Pieces White Pink Wood Handle Synthetic Fibre Nail Pen, JR1180 LINK HERE
It includes 15 different brushes and pens that you can use to create your nail art. My experience with these brushes has been positive: they're easy to clean and maintain, and there are lots of different brushes so you have all the tools you might need. I would not recommend using these with nail polish, because I don't think the brushes can handle being cleaned with acetone. Overall, the brushes are good, it's me that sucks. I guess I'm no Leonardo Da Vinci LOL. What I also like about the brushes is the design: white and pink is such a cute combination.
So, if you're thinking about getting a set of brushes or getting into nail art, let me tell you: prepare yourself for learning. Because it's not a piece of cake and you do need to practice a lot. 
Here is one more desperately bad nail look I did, that's supposed to be a penguin, btw. Actually, I think the little guy turned out OK, in a few practices I think I'll get a lot better. Nude polish used here is by Eveline cosmetics, shade 496, and the confetti top coat is by Maybelline, Polka Dots, shade 197.
And here is just a random nail look. Here I just wanted to test some new acrylic paints I got. Working with acrylic paint is easy, you just have to make sure to seal it in with a top coat. In my experience, top coat does not mess up the design (like it does if you do stamping and do not wait for it to dry). 
I also used the dotting tool from this set in a nail look I posted HERE, but I'll put a photo below as well:
So, what do you think? Did you try painting something on your nails, and it turned out NOT like what you expected? I might file some of the looks in the 'nail fail' category haha. Thanks for stopping by, don't forget to share your thoughts below.

love, Jelena

***KKCenterHk has sent me the nail art brushes for reviewing purposes. All opinions expressed are my own.

Snow Yeti Nail Look

Ola loves! :) Today's nail look was so much fun to wear. I love fluffy nail powder, but also, who doesn't love Yeti stories? Bwahahaha mystery! I've always loved Yeti stories because they never scared me, they were just funny! This powder will also come in great for winter or Christmas nail looks.

Products used:
Nail powder: N.NAIL Lovely Villus Nail Art Decorations-White [NNAIL-DRN861]
You can check out this product HERE, or browse through the KKCenterHk website HERE
I've also reviewed black fluffy powder from KKCenterHk, review HERE
There isn't much to be said: these nail velvet powders are easy to use, long lasting and look amazing. I highly recommend these products, because they're awesome.
Nail polish used: Maybelline COLORAMA, no. 51 (a little too watery and transparent for me).
I also did this weird nail look (photo below) with the white nail fluff, but I did not like the final result (meeeh, the stones are boring colors). Anyways, the nail polish used here is Maybelline COLORAMA, no. 70 (the perfect nude shade).
So, any nail fluff fans out there? What do you think of bright white nails in general? Yaaay or Naaay?? Thanks for stopping by, don't forget to follow me on all my social media.

Love, J.

***KKCenterHk has sent me this product for reviewing purposes.

Make Up Bowl, Week 2

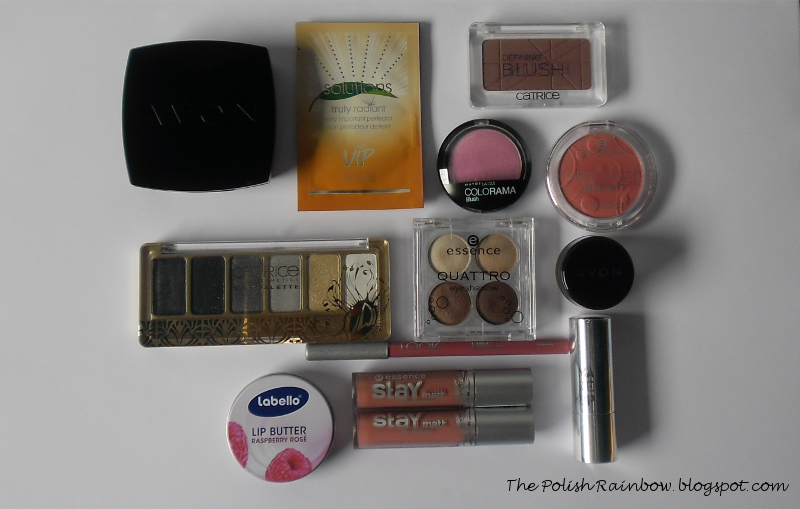
The concept of this is pretty simple: every once in a while, I put a few new products I need to test out or old products I haven't been using in a big red bowl, and I force myself to use them that week. Sort of a 'shop your collection' type of thing. Quick reviews and first opinions only!

Catrice, Feathers and Pearls Limited Edition, Eye Palette: This palette looks so pretty, yet it's almost unusable for me. The texture of the eyeshadows is too rough, and this is really not an everyday palette. It's special occasion looks only, which is not what I need. I like the dry/wet eyeliner. I use it wet, and it's super easy to work with. All in all, the palette looks good, but I don't really need it. I will not be reaching for it too often. REVIEW HERE
Essence Quattro eyeshadow, 01 Ciao Bella: These are so much prettier to me than the new Quattro palettes where the eyeshadows are so close to each other and the pots have weird shapes. I can never throw this away, the packaging is too cute. I expected bad things, but this is perfect for everyday. The shades are great for a natural look. Pigmentation is not good, but I don't care. I need to use this more often, it's great for when I'm in a hurry. The packaging is not good though, it's wobbly.
Avon Eyeshadow Base, Light Beige: I got this because everyone's been raving about it. I do not see a difference between this and your essence/Catrice eyeshadow base. It does what every base does - intensifies color, and eyeshadow lasts longer. I do not like the packaging, it's not convenient. It's an ok little product, but it's the same as any other in its price range. I wear it everyday even when I do not wear eyeshadow, so I do not have greasy eyelids. It's ok, it's just not THAT MUCH BETTER than other cheap eyeshadow bases. For special occasion looks, the best I can get out of this is 6 hours, then the eyeshadow collects in the crease. 
Catrice Defining Blush, 060 Rosewood Forest: This is why I love this Make up Bowl project. I thought this blush was wrong for me, and I discovered I love it. It gives a very natural look, and it lasts a long time. I got confused with the dark shade of the product, but once I apply it, it suits me perfectly. I'm glad I re-discovered this product. It's currently my favorite blush. REVIEW HERE
Essence, silky touch blush, 60 Life's A Cherry: Ugh, all the blushes from this range are horrible, but this one might be the worst. The color is too intense, so you can't help but apply too much. And it contains an insane amount of glitter. Stay away from these, try Catrice blushes instead.
Maybelline Colorama Blush, 201: Horrible shade, too much sparkle. Wrote a review of it yesterday, so I won't get into too much detail. REVIEW HERE
Labello Lip Butter, Raspberry Rose: Too sweet for me. No wonder I do not pick it up more often. It's good quality, I just don't enjoy the scent. REVIEW HERE
Make up Factory Lipstick, 150: This is supposed to be Muller's own HE brand. This shade is very dark, something Lorde would wear, but it's not worth the price (100 kn). It spills over the edges, it's difficult to apply evenly, has zero durability. I have 4 other shades from this brand, but I prefer their nudes.
Essence, Stay Matt Lip Cream, 01 velvet rose: Still too light for me, but the texture is good. These products are still available but in a new bottle design. REVIEW HERE
Essence, Stay Matt Lip Cream, 03 soft nude: At first I did not like it because I thought it was too dark, now I'm starting to give it a chance. It's the kind of shade Kylie Jenner can be spotted wearing. I'd only recommend this to people with big luscious lips, because if you have tiny lips, it will visually shrink them. REVIEW HERE
Look by Bipa, lipliner, 11 Peach: Not liking it, it has a weird texture to it, this shade is very drying, and I can never wear it by itself (which I can do with some other lipliners). It has a pearl-like shine to it. Not for me. Good for a Kylie Jenner look.
Avon Solutions, Very Important Perfector: The only reason I gave this product a try was because my Avon Lady gave me a ton of samples, so I thought that maybe she thinks this product would be good for me. It's not for oily skin, I think it would make anyone look oily. It's white, but has tiny yellow spots in it that tint the cream as you apply it. Doesn't hide any flaws. This is maybe for those people with flawless skin. Not for me.
Avon, Ideal flawless, 3in1 cream-to-powder foundation, Ivory: I do not think I'll ever buy any Avon foundation product again. The thing is, it's so important to try the shade on your face and you just can't do that looking through a catalogue. This is super yellow, not for me. I guess I could make it work, if the shade matched me in any way. The product feels nice on the skin, but I'm telling you, finding the shade that works for you is very difficult.


That's it for this edition of Make Up Bowl. Some finds, a little more tosses this week. Any products here that you have and love/hate? Let me know, and thanks for stopping by.


love, Jelena


Maybelline Colorama Blush, no. 201 - Review And Swatch

 This blush is perfect for you - if you're a 3 year old little girl going to a Disney-princess themed party. Ugh!

Type of product: Powder blush, light pink, shimmery
Product name: Maybelline COLORAMA Blush, no.201
Price: around 20 kn
Rating: 1/10
Would I repurchase: Only if I become senile, and not even then.
My opinion: You know what I do not understand: when people of Maybelline got together, and needed to decide which shades to feature in this range, they must have had a ton of options. How the hell this product made it to the top 6, I will never understand (seriously, look at the swatches below). The blush is a cold-undertone pink ('the satin-dress of a tacky princess' kind of pink). I do not care for the shade at all. It has a metallic-shimmery quality to it, so it's always reflecting light. It has very tiny glitter particles that are visible in the sun and in the shade. The texture is smooth, but very dusty. Pigmentation is good, which is bad, because as soon as you put it on, you want to take it off, (it looks horrible LOL). I can't do anything with this color. It doesn't even give you a nice dewy-finish. It just look infantile. Like a glitter-bomb. Honestly, I think only 3 year old little girls can pull this off. You can't use it as a highlighter either, because it's pink. If someone out there is in love with this product, comment below and tell me what you like, because I just can't see it. The positive side is that the packaging is safety-sealed. However, these blushes are not very sturdy, if they fall, they will crack FOR SURE.
This product is for you if: If you can't read.
You should avoid this product if: If you have common sense and are a grown ass woman.
Links: So, I won this blush on Taya's blog, and am very happy I won, even though I ended up not liking this product. Taya is awesome, check her out HERE.
I have reviewed one more Maybelline blush, no. 501, and I love it, review is HERE.
Do you like subtle or any kind of glitter in blushes? I do not enjoy it, I have oily skin, and avoid any glittery/sparkly face products. I'm shining most of the times anyways! I hope you all are having a lot of fun, don't forget to follow me on facebook, twitter (for all my ramblings) and on GFC and Bloglovin (all the links on the right side).


love, Jelena


Support : Creating Website | Johny Template | Mas Template
Copyright © 2011. photoshop art crochet - All Rights Reserved
Template Created by Creating Website Published by Mas Template
Proudly powered by Blogger